Moving to another country? Traveling for work to and fro all the time? Or just tired of paying Netflix more when you can easily get the unlimited content for much less in some other region? It can be quite devastating to find out that Netflix is charging you more just because of the location you are paying from.
Not to worry anymore because you can learn how to change your Netflix billing region from Canada by taking a look at our guidelines and save yourself a couple of bucks instantly without facing Netflix Error Codes!
You can also change your Netflix region to watch different content libraries on Netflix.
How to Change Netflix Billing Region While Travelling
You might be one of those people who travel a lot for business matters and probably also hold a legitimate bank account in those countries as well. You might be astonished to see the difference between the charges of a Standard Monthly Plan in Canada (costing you around 16.49 CAD) and the same type of features available in India (only for INR 499).
Here are the steps you can take on how to change the Netflix billing region from Canada and get charged to the minimum starting your next cycle,
Cancel Your Current Netflix Account
You can begin by canceling your membership (don’t worry, your data is safe for 10 months even after cancellation) and proceed with how to change the Netflix billing region from Canada.
- Visit the Netflix official website through a browser on any device.
- Sign in using your credentials.
- Click on your profile.
- Select the menu by clicking on the profile icon.
- Select Account from the drop-down list.
- Head over to the “Membership and Billing” section.
- You will see the option to “Cancel Membership.”
- You will be provided the option to Finish Cancellation.
- Click on it to confirm your choice.
Restart Your Netflix Membership
Now you will need to restart the Netflix membership and continue paying in a different currency (according to the country you are traveling to). After completing the process to cancel your membership,
1. You will be prompted to Go back to your account.
2. Head towards your account and click on Restart Your membership.
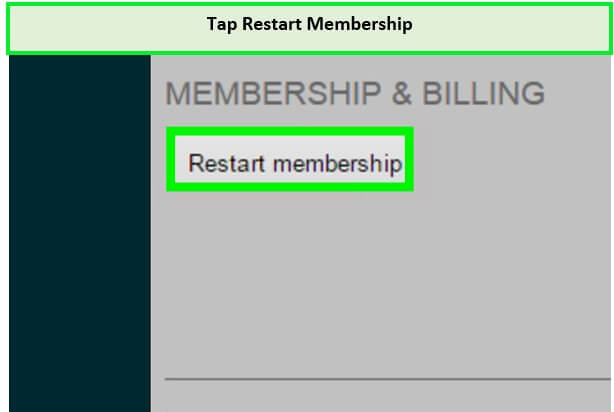
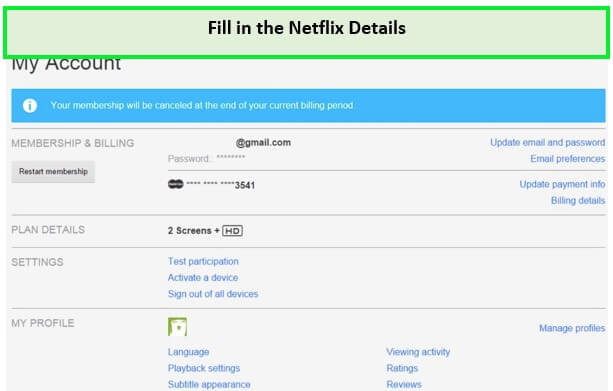
3. Fill in the details regarding your account according to the country you are traveling to.
Make sure that you cancel your membership at the end of the billing cycle, and when you are currently in the country, you want to use the account (for confirmation texts and stuff).
Things to Keep in Mind While Changing Your Netflix Billing Country from Canada
Here are a few things you need to keep in mind when you are changing your Netflix billing region from Canada.
Using Netflix While Traveling to Another Country
Learning how to change the Netflix billing region was not a big deal, but when you are in that country, you need to make sure that you have a working account with at least the amount required to complete the billing cycle.
Using Netflix While Moving Within your Current Country
You won’t need to learn how to change your Netflix billing region if you are not planning on living abroad. The only way you can use another currency to pay less on your next billing cycle is:
1. By Redeeming a Gift Card in that Country’s Currency.
For example, Netflix is providing its services in Turkey for a very minimal cost. You can follow the steps below to change your Netflix billing region from Canada even if you haven’t been to Turkey even once in your life.
- Get yourself a Turkish gift card (to pay in Liras.)
- Choose a VPN that works with Netflix and connect to Turkey. We highly recommend ExpressVPN.
- Access Netflix Turkey.
- Hit on “Get Started” to make an account.
- Choose your plan and proceed to payment.
- Choose the ‘gift card’ option and enter your code sent to you.
- Complete the signup process.
- Enjoy the cost-friendly Netflix.
2. Operating a Working Account in the Country You Want to Change your Netflix Billing Region to
- Connect to a VPN service (preferably ExpressVPN) that lets you mask your IP address to the country you want to be appearing from.
- Visit the Netflix official website through a browser on any device.
- Sign in using your credentials.
- Click on your profile.
- Select the menu by clicking on the profile icon.
- Select Account from the drop-down list.
- Head over to the “Membership and Billing” section.
- You will see the option to “Cancel Membership.”
- You will be provided the option to Finish Cancellation.
- Click on it to confirm your choice.
- You will be prompted to Go back to your account.
- Head towards your account and click on Restart Your membership.
- Fill in the details regarding your account details in the country you are appearing.
Using Netflix While Travelling or Moving to a New Country
Netflix can be accessed from over 190 countries in the world, and you won’t need to make any changes regarding changing your Netflix region on your iPhone or changing your Netflix region on your laptop.
If you reach the end of your billing cycle during the period of your travel, you will be charged in the currency from the country you signed up for. The only changes you will be seeing are,
- Choices and preferences of titles might vary from one country to another.
- Maturity ratings might differ from the region you came from until you have parental controls set up.
- The offline downloads you made before traveling might not show up on your tablet or iPhone, or other devices.
If you are permanently moving to another country according to Netflix suggestions, you will need to cancel your Netflix membership and re-initiate with the payment details of a working account of the newly moved country. However, just mentioned above, the preferences for maturity ratings, audio and video subtitles, and viewing preferences will now be according to the current region you are residing in.
Can I Still Watch Canadian Netflix if I Pay for a Different Netflix Country?
Of course, with the help of a premium VPN service like ExpressVPN, you can easily access not just Canadian Netflix but any country you prefer while not moving an inch from your location.
All you need to do is,
- Exit your Netflix app or close the browser
- Connect to a server in Canada from your VPN
- Go back to your Netflix app or sign in on the browser
- You will now be seeing titles from the Canadian region
Can I Keep my Netflix Profiles If I Cancel and Restart my Account in a New Country?
Whenever you cancel your membership, Netflix keeps your preferences and profiles saved for a period of 10 months until you decide to restart your membership again. Whenever you do so, everything will be the same except for changes due to a new region.
Closing
Whether it’s trying to learn how to change the Netflix language in Canada or how to change the Netflix region from Canada, we have got all the answers for you. Similarly, this article must have given you a sigh of relief when you read the contents and finally got the confusion regarding how to change the Netflix billing region out of your head.
Whether or not you want to change your region of billing is up to you; however, you can always change the region by simply connecting to a VPN and getting to view any title that isn’t available in your country.